Design: Joanne Grimes
Machine Pieced & Hand Quilted: Joanne Grimes
Size: 36" x 36"
Materials: Upcycled fabric from various used clothing & textiles
Meterial Types: loose knit sweater, shower curtain, light t-shirt, blended skirt, thick sewing cotton
 Click on a link below to see progress: |
|||
|
|
|
|
|
|
Mar 18************************************************************************* Ok this image looks familiar, but I've removed a finished design with some photo editing and circled the one that is next.  This design was done in pencil and the scan was very hard to see, so I had to fiddle with tones a bit. It looks like there aren't a lot of small pieces so I can use 1/4" on the design equals 1.5" on the actual template. That should get me to at least 30" square.  And....here I go with the drawing supplies.  Well that didn't take long at all. As you can see I had to add some paper. My math was off by about 6". My estimates of size seem to be lacking these last 2 quilt projects. Well at least it's just paper and pieces can be easily added. It's also nice to figure this out now before I start sewing it all together. I don't have to erase anything since I start from the middle anyway. It's hard to see, but circled numbers are the piece identifier which are placed around each edge so I know which pieces attach where.  Mar 19*************************************************************************
I'm picking fabrics today from my stash. I still have a pretty full tote so no heading out to the thrift store to replenish. I use what I have and this is a small quilt so not a lot of fabric is needed.
I'd like to get some different stuff, but I need to use these bits. I can't really make a large quilt because there isn't enough of each fabric for that, so smaller quilts must be made to deplete the stash. So far I can mix up the combos and amounts of fabric enough so that it's hard to tell from quilt to quilt that the same fabrics are being used. That is just fine by me. The process challenges my creativity which makes the art all that much more appreciated by me, myself and I. Ok, there I go off on a tangent again...

Here's what I ended up picking. I won't be using all the colors seen, but I need certain patterns and colors from each of the fabrics here. The fabrics belong to groups of pieces.

This list shows the fabric pieces in their respective groups, but not necessarily the sewing groups. I will figure out sewing groups once I start piecing and sewing.
 Mar 31**************************************************************************** It's been a week or so, but I'm back to sewing now. I will start, as always, with the middle rounds.  Here is the entire round all nice and laid out so I can see where I want to sew stuff together.  This sewing group was a bit dicey since there were very few straight lines. I did rip and resew quite a few times to make sure the lines matched up. This is the order of the first sewing group. This was then more or less repeated 3 more times. The template and sewn pieces are mirror images.          Ah...The 1st rounds are done. It doesn't look too bad. In fact I like it. I don't really audition fabrics beforehand, so there is a bit of "oh boy is this gonna work" going on while I sew the pieces together. No, I don't iron or press the finished round. Pressing or ironing stretches the fabrics and makes it harder for me to find my marker lines when I need to sew new rounds to this one.  Apr 1***************************************************************************** I am on the last rounds. Here are the pattern sections which most likely will also be the sewing groups. 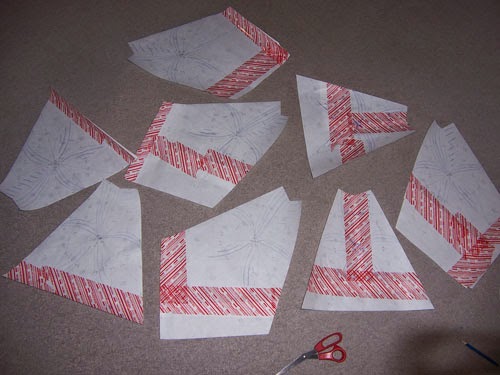 All the pieces are pressed, cut and sorted into fabrics groups. I almost had a huge mess. I had some paper patterns in the wrong pile while ironing to the fabric. I forgot to double check to see if everything was in its correct fabric pile before ironing and tracing. That was idiotic on my part. All was saved though because I was able to interchange the pieces and simply re-iron and trace with a different colored marker. There will be a couple of teeeensy color variations that I didn't particularly want, but I probably will be the only one who can tell when all is done.  Now the pieces are laid out with one sewing group separated from the others.  One sewing group is done. I didn't show each and every step because I may do the next 7 groups slightly different each time or maybe I just forgot to snap a pic each time I sewed a piece on. I'll take pics with the next group. A lot of times' how the pieces get sewn together' changes if I think there's a better way to connect pieces. It's all trial and error as I go.  Apr 2***************************************************************************** Here goes the next sewing group. I took pics of each line sewn. I thought of making this a little animated bit, but I had already edited the pics in a way that if put together as an animation it would give you a headache and I'm pretty sure fiddling with a solution would take longer than just having a look at the images on your own time. On that note here are 13 sequential images to peruse at your leisure. I end with the sewing group from yesterday and the one completed today sewn together to the main round. I believe I will be repeating today's sequence 6 more times.           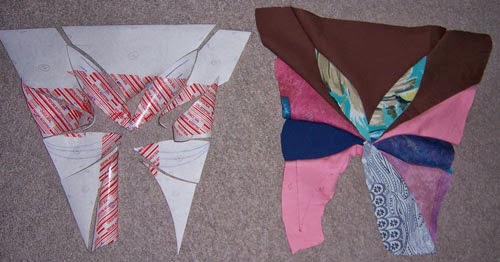   Apr 3***************************************************************************** I put on 2 more sewing groups. I don't need to post the step by step process for the rest of the sewing rounds on this quilt because, well, that would be extremely tedious and boring. I'm just repeating myself anyway. This thing is starting to look pretty neat! I'm always sweetly surprised at how well these turn out since I really only do the fabric selection with just a general idea of what it should look like when done.  Apr 4***************************************************************************** I know it's a bit late in the game, but here's the types of fabrics I am using on this quilt. The numbers correspond to the fabric the pieces came from. 1-I got this heavy cotton from my neighbor. She gave me her "I'm not going to use this" fabrics, which I eventually find a use for. 2-This came from an old cotton blouse from some of my grandma's old clothes. 3-A light shiny blend of some sort 4-Some sort of light cotton (maybe) 5-A sweater knit that I had to cut a bunch of beads off of, but it had these cool designs I could use in odd places. 6-A pair of women's dress pants. The fabric is sort of shiny, thick and does not slide well. I'm betting it's some sort of blend...safe bet there...."cricket noise" 7-This was an interesting thick t-shirt that had neat geometric squiggles of different kinds all over it. 8-A shower curtain that resembles the batik stuff. It has different colored squares and triangles all over it. 9-An actual thick cotton fabric meant for quilting. 10-A really thin t-shirt material halter top. 11-Another actual cotton fabric meant to be used in sewing. All of these came from either friends, family or my local thrift store.  And only 1 more sewing group left!  Apr 5***************************************************************************** I got done with the piecing. I include the border as part of the piecing.   I put the sandwich together and pinned it. I have my square hoop placed and I'm ready to hand quilt the top. It's a small quilt and I like the results of hand quilting better than the machine. Besides I can use all sorts of different threads, stitches and embroidery tricks that my machine won't do.  It's hard to see, but I've stitched around the middle flower and put french knots in the 8 smaller flowers. I am outlining the blue lines in the leafy and teardrop like designs.  Apr 6***************************************************************************** I get the actual quilting done on the middle rounds. I'm using embroidery thread 1 and 3 strand. I used a basic over under stitch. I guess you could call it that. I'm no expert on the proper names of these things. I use whatever stitch works for the look I want. Most of the time I don't want the top quilting to be noticeable. I build my quilts the way I do because I want the piecing to be memorable.  Now I'm onto the outside 'petals'. The threads there are what I plan to use for these rounds.  Apr 7***************************************************************************** As you can see I changed my mind about what threads to use. The blue and dark grey were not going to make it all the way around the quilt, so I had to pick different threads. I'm following the original sketch pretty closely. I deviated some in the center, but I wanted to keep the center flower intact.  Here's a closeup. The stitching is nothing fancy, just the over-under stitch and then repeat on the way back to fill it in.  Apr 8***************************************************************************** Continuing to hand quilt the top. I usually stitch in the ditch, but I decided that certain parts would be stitched just near the edge for a different visual. I am doing a disappearing stitch in some ditches where I don't want any thread visible. I still haven't quite figured out what I'm going to do to quilt the brown area.  Apr 9***************************************************************************** I keep chugging along with the hand quilting.  Apr 10**************************************************************************** And sew on...Ya I know I used that before...  Apr 11**************************************************************************** Done with the main rounds. Now I just need to do the brown area.  Apr 12**************************************************************************** Woohoo onto the brown area! I'm using a sort of graduation of colors with a bright spot in between.  And I'm liking the results! Yay!  Apr 13**************************************************************************** I am done quilting the top! 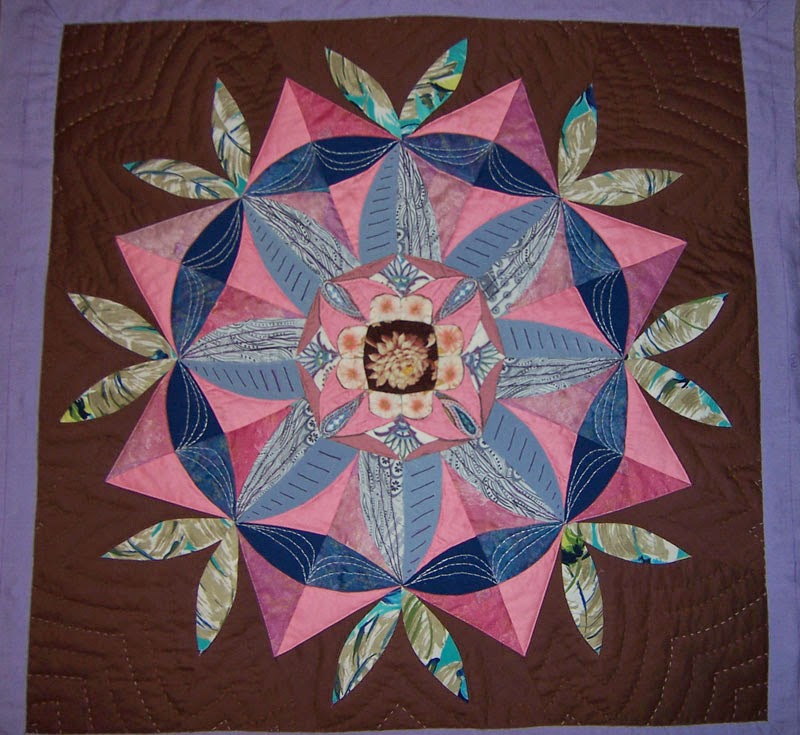 Apr 14*************************************************************************** All done except for the sleeve and a better pic  |
|||
