Castle Turret

    Details:
  • Dimensions: 42" x 42"
  • Design, Piecing, Assembly and Hand/Machine Quilting/Embroidery: Joanne Grimes
  • Fabrics: Varieties from local thrift stores
  • Quilting/Embroidering Threads: embroidery and light yarn
  • Embroidering/Machine Stitches: basic machine stitch, embroidery running stitch and french knot

Another project gets its start. The top of the castle turret is done. There are some interesting little things hidden in this quilt. The outside plain block colors correspond the the opposite hexagons. Those colors also are supposed to make up the 6-colored flower schemes (minus any orange color)too.

    Click on a day to see progress:
  • Day 1, Feb 2017
  • Day 2, Feb 2017
  • Day 3, Feb 2017
  • Day 4, Feb 2017
  • Day 5, Feb 2017
  • Day 6, Feb 2017
  • Day 7, Feb 2017
  • Day 8, Mar 2017

  • Day 1, Feb 2017

    I pick the design.


    Here's the original rough sketch design. This is the squarest design I've created and it wasn't really intended to be that way. My designs just happen. I thought it looked like the top of a castle turret, so that's what I called it.


    A closeup of the design showing an outer edge. The non circled numbers tell me where each piece connects. The circled numbers are the represent the pieces.


    Day 2, Feb 2017

    Okey dokey, here's the fun part. The numbers running down the left side (1-21) correspond to the fabric selection. The groups of numbers associated with those numbers are the piece labels.


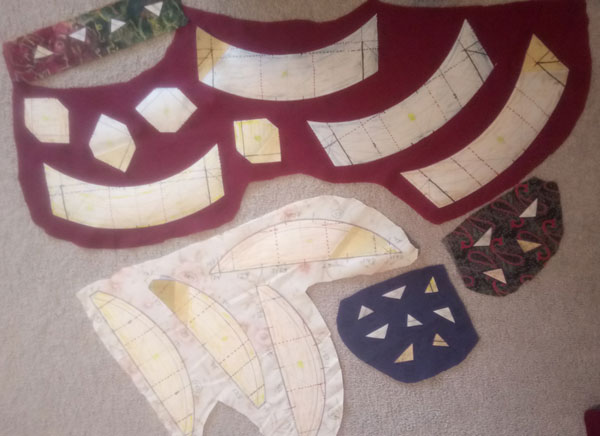
    The first round is cut out.


    The layout of the hexagons.


    One of the hexagons sewn together. I know it's not a perfect hexagon. It's how the design worked out.


    A quick look at how I sew on the line from point to point. The alligator clip makes sure the points are exactly lined up.


    All four hexagons are sewn.


    Day 3, Feb 2017

    Round two pieces are laid out.

    Round two is all sewn up.


    Round three is laid out.


    Round three is all sewn.


    Day 4, Feb 2017

    Round four is laid out.


    One side of round four is sewn.


    Day 5, Feb 2017

    Round four is all sewn up.


    The final round is laid out.


    Day 6, Feb 2017

    The top is done.


    Day 7, Feb 2017

    The yarn, embroidery, and other threads that will be used to hand quilt the top. The washable marker lines are part of the spiral-ish top quilt design.


    Day 8, Mar 2017

    All done


    back to top

    Nazca Star and Cross

      Details:
    • Dimensions: 37" x 29"
    • Design, Piecing, Assembly and Hand/Machine Quilting/Embroidery: Joanne Grimes
    • Fabrics: Varieties from local thrift stores
    • Quilting/Embroidering Threads: yarn and machine thread
    • Embroidering/Machine Stitches: Stem,Running Embroidery, and Straight Machine Stitches

    Once again it has been quite awhile. I sort of appropriated this design from a design left in the desert of Peru in the Palpa valley of the area known as Nazca. This design may or may not be ancient, but it is only seen from the air. It is up my alley since all my designs are circular geometry.

    Here's some context. The cross and star is located in the southern tip of Peru, South America. It's in the very remote Palpa valley.

      Click on a day to see progress:
  • Day 1, Jan 2017
  • Day 2, Jan 2017
  • Day 3, Jan 2017
  • Day 4, Jan 2017
  • Day 5, Jan 2017
  • Day 6, Jan 2017
  • Day 7, Jan 2017

  • Day 1, Jan 2017

    I pick the design.

    This is the design. It's not technically my own design, but no one has claimed ownership to the design left in the South American desert. I did have to figure out how to make it workable for a quilt design.


    The tools I use to draw the design to size.


    This is the pattern drawn to size. I did have to make some corrections and since marker isn't erasable I had to go over it with a different color.


    Day 2, Jan 2017

    I picked out fabrics and grouped the numbered pieces in their proper fabric selections. I used 8 different fabrics. I originally picked out 14 fabrics, but I changed my mind after sewing the first couple pieces together.

    The highlighted numbers correspond to pattern pieces. The numbers going down the left side indicate which fabrics go with each piece. Since I messed up the pattern somewhat there are some missing numbers, but I figured out what goes where as I went along. This project really was an "adapt and overcome" situation.


    Day 3, Jan 2017

    I start in the middle as usual. This is the grouping that fits together quite well for ease of sewing.


    The pieces are pressed onto their fabrics.


    >

    Showing four pieces are sewn together.

    Here is the layout of the first group.


    The first 2 pieces are ready to be sewn together. I sew on the line.


    On a side note, I use an alligator clip to keep the threads taut before starting to sew a line.


    All the center pieces are sewn together two by two and laid out.


    Day 4, Jan 2017

    These pieces make up the little squares adjacent to the pieces that were just sewn together.

    The pieces are laid out where they will be sewn on.


    The group is almost all sewn together.


    The squares are starting to get sewn together.


    And then the squares get sewn to the center sections.


    The corner pieces.


    The corner pieces laid out.


    The square section sewn.


    Day 5, Jan 2017

    Now the inner circle pieces are cut out.


    Then laid out.


    The inner circle is sewn on.


    Day 6, Jan 2017

    More pieces are laid out.


    And sewn together.


    Another group laid out.


    More sewing done.


    The top is done.


    Day 7, Jan 2017

    So I'm quilting designs from the Nazca desert on the top. Here's a little map that shows some of the figures. It's not the most accurate map, but it gives you an idea of what was done in the Nazca desert so long ago.

    I draw the little desert drawings on my quilt top with washable marker.


    I'm putting on the border here and this shows the quilting on the back of the quilt. (ya I know I've changed my english tenses in this story, oops)


    Some closeups of the figures in the quilt top. I signed the middle of the tree, too.


    And all done. Yay! I apologize if the story on this one is a little strange. I put the quilt together entirely before I did anything with the pics and blog. That's my excuse and I'm sticking with it. ha