

- Details:
- Dimensions: 41" x 41"
- Design, Assembly and Hand Quilting: Joanne Grimes
- Design Software: Electric Quilt 7
- Fabrics: Varieties from local thrift stores see Fabric Reveal
- Quilting Threads: 3 Strand Embroidery & Punch Embroidery Yarn
Now that I've evened up my gallery, I can start on another quilt which will make things uneven which will have to be remedied which will...Ooops almost forgot what I was trying to do. Ah yes, build a stupidly complex quilt. I'm doing a radical twist on the traditional Log Cabin.
| |||
|
|
|
|
|
Here we have my lovely bunch of designs. Notice I added some that look familiar? Those are tie quilts I made for family, but I still want nice show quilts from the designs, so I will be redoing them, but smaller and different fabrics. Technically I'm breaking my wee rule about making a design more than once, but I do want all of the designs to be 'show ready'. Ok now to disappoint you. I'm not 'redoing' any of those familiar designs. I'm going to tackle another one of my custom Electric Quilt (EQ7) designs. I circled it over on the right corner.


This design was extremely simple to create on EQ (copy and paste a rectangle all over the place), but it's going to be quite a challenge to piece it into a quilt. There will be much weeping and gnashing of teeth...too biblical? Just so I'm clear. It's gonna be a doozy.
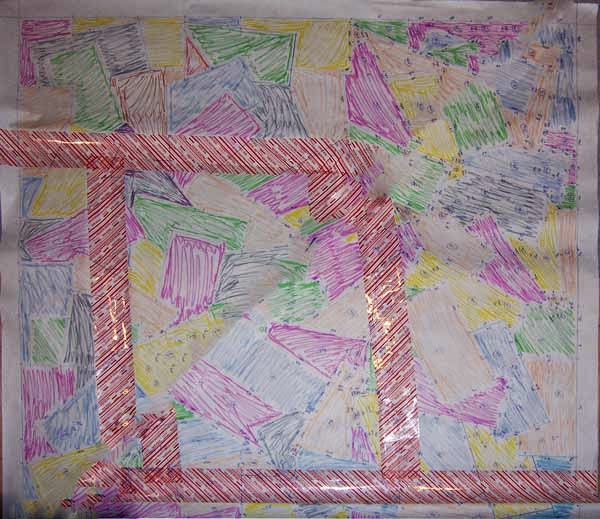
Now this is what the drawn out life size pattern looks like. I had to color code the rectangles so I didn't forget what they looked like or what pieces went to what rectangle block. I also did the color blocking to make sure no block colors touched each other.The quilt will be about 42" square when done.
A close up of the pattern template. The circled numbers are the piece numbers. Then each piece number is written on the inside edge of each piece it connects. Each colored block has one number followed by a letter if there is more than 1 piece in the block, auch as piece 6. It has 6, 6a and 6b. The colors will not match the fabrics I eventually pick out. I do a lot of point to point sewing as one can see.

I picked these fabrics based on how they contrast each other, so if any of them are next to each other you can tell them apart. I also picked an extra pattern and solid fabric just in case all the other colors are used around the piece.


The first section is cut out. I cut it out based on the longest straight lines that make somewhat of a square.
The color coding from the template helps with the fabric selection for this section. I switched the green fabric for the bright blue, but I forgot to retake the pic.


Here's a sample of the paper pieces ironed to the fabric. Everything is traced and marked so I know where to connect the fabric pieces.
The pieces are all ironed and labeled. The pieces are put back together like a puzzle and ready to be sewn.
The first two pieces are ready to be sewn together. I sew point to point. The alligator clip is there to make sure the fabric stays in place until I lower the needle. I pin line to line.


So after many hours of piecing and thinking, the first section is done. I didn't have a set plan on just how to sew the pieces together. I figured it out on the fly. I always do it that way though.

Well as I was working along, I realized I wasn't doing any documentation. So there aren't any pics of the template of section 2 which I worked on today. I did get a pic of the layout and where I stopped for the day. It looks like one big mess doesn't it? I also discovered that putting this thing together isn't as hard as first anticipated. Now that I've figured out my method of madness I can scoot right along.


I managed to finish up section 2 and connect it to section 1. It's not looking to bad at all.
So of course I forgot to take a pic of section 3 template. Again here's the layout.
Here's how far I got today. Yup still a mess. I added some smudge for extra special mess. ha


Section 3 gets done and connected to the main body. It's looking a bit more interesting. Other than trying for straight lines, there is no rhyme or reason on how I cut out my sections from the template.


Ok this time I remembered to take pics of the next section, which is the last one. The template is on the left and the layout is on the right. Quite some time passed between 'cut-out-of-template' and 'layout'. I had to press, trace and cut out each piece as noted at near the start of this project


Yippee! Section 4 is completed which is on the left and then attached to the main body. Not bad at all, not bad at all. I guess I fibbed about how hard this quilt would be. It was really easy. Even the fabric picking from section to section was easy. I just had to make sure no rectangles touched each other.


I didn't get a whole lot done today. The borders did get attached and the quilt top is ready to be sandwiched.

A lot was accomplished today. First I pinned the binding to the back of the quilt.

Then the bobbin was loaded with invisible thread and the tension is adjusted.

I sew the binding from the back with extremely tight tolerance to the binding border. The invisible thread is useful on the front of the quilt in cases of run over into the main design.


The binding is finished. So far so good on the color and pattern selection.
- The numbers go with the fabric and thread.
- Fabric: cotton pattern Thread: 3 strand Variegated embroidery floss-off-white to dark green
- Fabric: rayon 1950s casual dress (I think my grandma wore it) Thread: 3 strand Variegated embroidery floss-off-white to dark pink
- Fabric: stretchy Victoria Secret hoody (I loved the color at the thrift store) Thread: dark blue shiny punch embroidery yarn
- Fabric: heavy embroidered drapery Thread: shiny pale blue punch embroidery yarn
- Fabric: plain cotton/mix Thread: pale yellow punch embroidery yarn
- Fabric: heavy cotton (guessing here) rough weave Thread: shiny red punch embroidery yarn
- Fabric: olive green cotton/mix Thread: 3 strand olive green embroidery floss
- Fabric: cotton pattern Thread: 3 strand variegated embroidery floss-light red to dark red
- Fabric: stretchy almost t-shirt material cotton


Now that the reveal is out of the way, it's time to hand quilt the top. I cut a square spiral into my original rectangle block. Then I traced it onto each block with my trusty washable markers.
The hand quilting commences.


Just the back today. It's hard to see the quilting on the front. The back shows progress better. I found some issues with the order I put this thing together. That will be dealt with tomorrow.
Continuing the hand quilting...


So it just looks like I moved the square hoop around. I did, but I left quilted top in its prior place.
Still quilting the top. I moved the hoop just a bit. A little every day gets done at least. I make sure each rectangle gets fully in the hoop when I'm doing the top otherwise the fabrics stretch out of proportion and mess up the straight lines.


Ya ya I know it doesn't really look like I did anything or even moved the hoop, but I did. It's getting there.
Getting repetitious eh? Well now you know what hand quilting looks like day after day. Not much excitement. Now you also know why I consider this aspect the most tedious part of making a quilt.


Weehoo! The top hand quilting is done. One exception though, I had to rip out the binding along one edge. A note on the invisible thread I used in the binding. That stuff does not rip easily. It does pull out nicely. Remember a few days ago I mentioned that I had made a miscalculation to the size of the back piece? I was off by about a 1/4 of an inch. The other sides are good though.